The Sorcerer's Knot
'We followed the map as best we could, periodically checking our bearings using the chronograph and the sextants that the seer had given us. Eventually we found the deserted location that corresponded to the coordinates on the rapidly disintegrating map. And we began digging...
'We started a trench that went down about fifteen feet into the baking sand and headed due South. After a few hours our spades rang with the sound of steel on stone and as it did so the group gathered round to see what we had hit. Some hand digging revealed a dark black stone that had been carved with a strange texture on it's surface like a series of overlapping layers of petrified tendrils frozen for perhaps a thousand years. It looked and felt utterly alien, and yet our goal lay in the centre of this forbidding artefact.
The Sorcerer's knot is an underground stone cube containing a number of cellular rooms and a large hall at its centre. In my own adventure I had a demon's head buried in the central hall which the players have to obtain. The talking head then unwittingly supplies the players with clues which help them to complete of the campaign. You can set up any motivation for solving the puzzle but it is intended to be a challenge to solve so the prize should not be essential for the completing of your campaign, only an enhancement of it.
Back story
The following is an excerpt from a soldier's diary that indicates how the cube was made. It was written during a battle between Angels and Men, and Demons lead by one Phisen-Shin who has ordered one of his lieutenants, Shiver, to provide a rear-guard defence to buy himself some distance between himself and the pursuing Angels/Men alliance.
This diary is hundreds of years old and should be found or obtained by your players well before they encouter the Knot and with lots of other text around it so that it doesn't just look as if it's been dropped into the game for this scene.
20th day of Anavar 3018
It looks like we will face Shiver in the morning. He has remained behind at a high point in the desert just behind the ridge of rock escarpment obviously to try to surprise us in a rear-guard action. Our spies have been rather vague as to accurate disposition of his forces but I suppose they were lucky to get away with what they had. We've lost so many scouts to the enemy. The Gods only know what became of them.
21st day of Anavar 3018
This was the bloodiest day I have ever seen and most of it was demon blood too! After the rout Shiver tried to escape so Lord Amroth sent heavy cavalry to run him down and finish him. Apparently he swore revenge before he was finished, not against us but against Phishen-Shin for leaving him to carry out a suicide mission.
Now that we have a battlefield full of corpses we spent the night sorting the bodies into demons and Men of the Fen so that our brethren can be taken home and the demons can be dealt with to prevent their resurrection or their return to whatever plane they came from.
As I write the engineers are marching off to dig eight enormous pits about a mile apart in which they will build stone receptacles to store the separated body parts and then the mages will seal them shut and the sand will be poured back over them.
22nd day of Anavar 3018
Today I joined the craftsmen and artisans in the assembly of the stone bunker into which the demon flesh will be secured. Hundreds of similar rooms have been created with portals linking each room to it's immediate neighbour. None of us can see the point of that. Portals are for travelling long distances not the six inches between one room and another. Maybe the mages know what they're doing, or maybe they've all gone insane simultaneously!
Anyway, my unit has been tasked with manoeuvring the rooms over to the pit and craning them all into their correct positions. When correctly assembled the arrangement of rooms creates a three dimensional maze which any resurrected demon or foolish adventurer will have to solve to exit or enter.
23rd day of Anavar 3018
The pits have been dug and all the troops have been ordered out of the area. However, a friend of mine and I decided to stay behind hidden in the shadows of the aqueduct's arches and we saw the strangest thing.
Twelve mages came and encircled the open stone container and engaged in a ritual chant that caused everything in that locality to vibrate. Then, before my eyes, all the rooms that we had assembled within that concrete tomb did what I can only describe a ‘shuffle'. When it was over all the rooms were in different places. I imagine that any attempt to enter or exit that structure again is beyond human understanding. But is it beyond a demon's?
Gameplay
There are a number of phases that adventurers minds may go though when they encounter and attempt to solve the Sorcerer's Knot.
'Should be able to solve this in about five minutes'
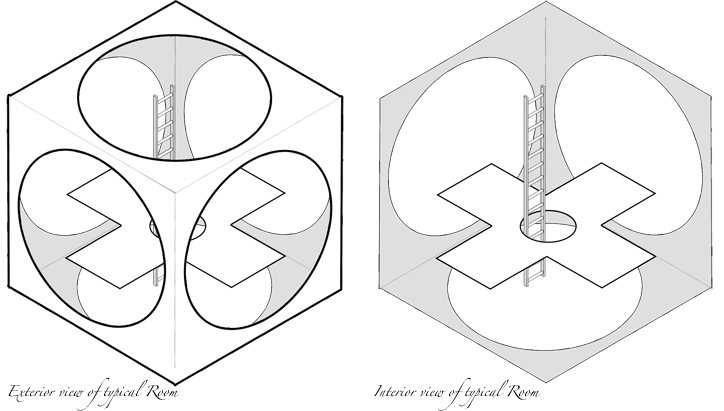
When the adventurers first dig down to the entrance of the Knot they will see from the first room that the cube is full of rooms about fifteen feet cubed. Each room contains a platform in the centre about five feet square. Some rooms have ladders going up from the platform, some down. Some have pathways heading North, some South, East and West. In any one room the ladders and paths may occur in any combination.
Observed from the entrance the rooms appear to form a three dimensional maze around a large hall, forty five feet cubed in the centre of the Knot. The entrance door to the Hall appears to be opposite the main entrance where the adventurers are now standing and it seems to be just a matter of following the path forward to get to the centre.
Post-shuffled map
In the map above you can see the maze that the party sees as they move around the knot. Up and Down arrows indicate ladders or staircases.
'On second thoughts, I may not live long enough'
As the diary says, the rooms have been shuffled but, via their portals, still retain their original maze configuration., which is totally different from the visible configuration. The portals transmit mass but not light so when a character steps into another room (say, to the North) they will pass through the interconnecting portal and find themselves in a different room that they were expecting: that which was to the North before the mages shuffled the rooms. Which is now in a different position. And might be on another floor.
'Oh, I get it now!'
This may be where your party gives up. If this is the case you could subtly remind them of the soldier's diary lying at the bottom of someone's handy haversack. Knowing how the maze was created is the key to solving it. Since the portals preserve the original arrangement of the maze the visible appearance of the maze is irrelevant. The maze must be solved as if the party are blind, feeling their way around the maze and mapping it as they go. They will eventually end up with a map of the maze in its original form and in doing so will find their way to the Hall at the centre.
It may require an epiphany before they realise this but then, its not meant to be an easy puzzle!
Tracking the party
In order to track the party through the maze it is necessary to create two mazes for the Knot. I have supplied examples here. These are for the purpose of 1) showing what the PCs can see from their current locations and 2) allowing the DM to track where they go when they pass through a portal between the rooms. You will also need a matrix which maps the portal relationships between one map and the other.
Pre-shuffled map
The rooms are defined by coordinates made of three parameters. Looking down on the cube from above, the rooms are labelled with their x and y coordinates, as you might expect. Additionally, the floor levels are numbered 1 at the top down to 9 at the bottom (like basements).
When writing down the position of a room it is done thusly:
FXY
Where F is the floor number and X and Y are the coordinates on the
top face. Since all the numbers involved are single digits I don't
bother with commas.
So, for example, the entrance to the cube is located at 551.

To track you parties movements around the knot you need a matrix that maps original pre-shuffled room positions to their visible post-shuffled positions. This matrix is provided here:
Shuffle Matrix
Game Mechanics
This maze is obviously much easier to run if you print out the maps and the matrix and use appropriately sized markers (smaller than a square) for the players (you will need two markers for each player). Then follow this sequence of actions:
- Start with all player markers at location 551 on both maps.
- Let your players tell you which direction they wish to go (for example, East).
- On the pre-shuffled map move the counters in that direction.
- Look up where that room was shuffled to by looking it up on the matrix. (541 moved to 278)
- Place the players' markers on that coordinate square on the visible map.
- Repeat from step 2
Giving your players a break
I understand that many DMs and players don't like puzzles to be too difficult so I felt it important to be able to manage the difficulty and tedium of mapping the knot. I have already covered the fact that the Soldier's Diary can always be brought to the players' attention and you can drop as many clues as you like about how the puzzle should be solved.
The destructive solution
In the event that your players are unable to complete the maze you could allow them to just blast their way through it. Each room between the entrance doorway and the central hall could be destroyed and the players could walk on the top sides of the ceilings of the rooms below and enter the Central Hall without passing through any portals. If you want to eliminate this possibility you might want to make the knot constructed of a material indestructible by any means available to the party.
Credit where its due
If your party are able to solve the puzzle but do not want to spend long trying routes through the maze you could do the following:
When the players realise that the maze has retained its original configuration via the portals you could just give them the pre-shuffled map for them to solve 'at the table' and then move their characters to the Hall.
Shifted Cubes (optional idea)
In their haste to finish the maze, the foundations were not properly constructed. Eight cubes (a 3x3x3 brick) in the bottom southwest corner has settled about ten feet lower. The portals between the cubes are undamaged, and the maze is
unaffected. However, these 8 rooms are
now at a 45 degree angle, and are 'standing' on one of their corners. Not only are the rooms more difficult to
navigate, but they also pose a risk to someone entering the cube. Since the cube appears normal from the
outside, a person navigating the maze risks taking a nasty fall if they enter
the room uncautiously.
Shipwrecked Room (optional idea)
Not all of the mages involved in the construction of the
Sorcerer's Knot were there for altruistic reasons. One of them, an ambitious young transmuter
named Alosius Hanfold, returned several months later. With his knowledge of the cube's
construction, he was able to bypass the safeguards and steal room #128. This room was transportedwith great
difficultyto a harbor and loaded onto a ship.
Whether the storm was natural or sent by some divine agent, the result
is the same: the ship sank over one of the deepest parts of the ocean, and room
#128 sank into a trench.
While the maze is still intact (since the portals are not
functional from the outside surface), room #128 is very, very cold. Over the years, water has condensed on the
surfaces of the cube, and the inside of the room is blocked off with spiny
blooms of condensed ice. An ice pick or
hammer would be useful in hacking through this ice-choked room. Additionally, a tiny amount of external water
has permeated the room, although only a small puddle of brine in one of the
corners gives any clue to this.
If anyone were stupid enough to hack through the wall of
room #128, they would most likely be killed by the crushing jet of abyssal
water. Many of the other rooms would
likely flood as well, before the portals overloaded and shut down.
Not Registered Yet? No problem.
Do you want Strolenati super powers? Registering. That's how you get super powers! These are just a couple powers you receive with more to come as you participate.
- Upvote and give XP to encourage useful comments.
- Work on submissions in private or flag them for assistance.
- Earn XP and gain levels that give you more site abilities (super powers).
- You should register. All your friends are doing it!
? Responses (14)
Wow. Fancy images, journal entries, and sorcerer-knot riddles!! Do finish this one!
Finished due to popular demand!
I'm blown away! (No, that is not my comment, but it will do for now, while I digest this beautiful sub!)
Extremely well presented and organized. I thought I didn't get it at first, but your well-presented diagrams really cemented it for me. Very well done.
Thanks, Dozus. The diagrams were half the fun of creating it!
Yeah, this one is awesome. As i read this, every time i started thinking, 'ok, but what about...?' you seem to answer the question in the next few lines. Very well written, perfectly complete and usable, even covering thoughts for lazy/frustrated gm's and/or annoyed players/characters.
Naturally, the tables, matrixes, and diagrams rock and bring this to life!!
Thanks for the comment, Murometz, and I'd be very interested to hear of the outcome if you or anyone else uses this in your own campaigns.
Very nice. It has been quite some time since I have commented on anything even though I lurk almost everyday. The Knot reminds me of the movie(s) 'the Cube', but in a good way. I almost never use diagrams and maps when my players are in a maze/castle/catacomb/etc and instead rely on description and verbal communication. But this would be one of those rare times I would run a session that is dependant on maps.
The GM would need to be careful so the session does not bog down in minatue and frustrate the players. But you covered that as well. I also enjoy the backstory and the ambience nuggets provided, even though they are not needed and a GM may provide backstory themselves. Bits like that fire up my imagination and I do prefer them over a bland and dull post that only covers the vitals.
I mentioned 'The Cube' earlier, I do not know if you were inspired by that movie or not. But your post is independent from that anyway and stand fine on its own. Congratulations on an excellent piece. Make more!
'The Cube' must have passed me by I'd honestly never heard of it but having now read about it on Wikipedia I can see the similarities you allude to: the cube of cubes, the Cartesian coordinates...
...but not the horror!...
...unless the GM wants to add some!
Thanks for the vote.
Forget it as an encounter piece, I want to give it to my son as a mapping puzzle just to play. I only now think I understand it as I have only read it (a couple times) and haven't gotten too deep into following the maze through it. This is bookmarked with the other game Four Forges: A simple board game played by Dwarves to try at home.
Very impressed with the graphics and their readability. Very well done!!
The idea is good, but the execution is GENIUS. I, for one, would like to see more stuff like this on the Citadel. This sub accomplishes exactly what it sets out to do. My only complaint is that I wish the soldier's diary had more fluff (useless information, setting, and flavor) in it.
How did you map this monstrosity, initially? Is there a program for this or do you just have a giant notebook somewhere?
Mapping this monstrosity was originally done by using excel to draw nine grids on an A4 sheet, printing them out and then just playing with the maze design for the 'pre-shuffled' maze. Once that was done I printed out each maze floor on an A4 sheet with coordinates in a corner of each room. I cut out all the rooms into small pieces of paper about 1 inch square and laid them out on a table in their 'pre-shuffled' arrangement. Then I built the shuffled version of the maze by moving each square to a new position.
This got pretty difficult towards the end as I was left with a limited set of remaining tiles and limited ways in which I could use them so it took about a week of 'shuffling' before I was happy with the final maze arrangements.
Then I had to go through each of the paper tiles to see where they had moved from (remember the coordinates in the corner) in order to build the transfer matrix. Another week of 'spare' time gone.
Fortunately I have an understanding wife!
I was afraid of that. I spent some time pondering, and I couldn't think of a way that didn't involve a lot of shuffling tiles around. Props to you! That's quite an achievement.
Over the top presention here. Very well done!